Recently, much to my horror, I realized 70% of the images uploaded to my blog were not optimized properly. I found this out only after doing a page speed test and seeing an alarming amount of red. Insert panic mode.
I googled the optimal size for blog photos, and found most websites advise photos to stay under 500KB.
Even though I thought I had all my photoshop and lightroom settings dialed, and was using Tinypng for every image, I still had some images in the 3MB range.
Yes, not good. I looked into my options, as the last thing I wanted to do was source out all the large files, open them in photoshop, resize them, and then re-upload them to my blog.
Luckily, I found a solution to reduce image file sizes in WordPress, saving me a ton of time. Phew! I wanted to share this newfound knowledge with all the newbie and veteran bloggers out there as this can really affect SEO and is a relatively easy fix once you know how to save your photos properly before uploading.
In this post, I first explain how to find out what the optimal width is for your photos based on your blog, as that will determine how you size them. I then go through how to change any existing large files you have already uploaded to WordPress/your blog, and finally, I show you what settings you should be exporting your photos with from here on out to avoid all this!
First things first.
Find out what the width of your blog container is.
- To do that, open Chrome and go to one of your blog posts
- Right-click near one of the images
- Click “Inspect”
- When the inspect tool opens, click the arrow within the square icon (far top left)
 Hover over images and blog text and the dimensions will appear. Keep scrolling to make sure the width is uniform throughout.
Tip: Your blog width can sometimes be found under your theme settings in WordPress if your theme is hosted through WordPress versus a third-party.
Now that you have your blog width..
Identify the images you currently have on your blog that are weighing down your site
To do so:
- If you don’t already have the Smush plugin, download and activate it now
- Open your media library and make sure it’s organized in list format versus little thumbnails
- Once that is done, click the smush button to the right of your photos. It will show you what size the image is after the “smush” process. If any of your photos are above 500kb, you will want to resize them.
How to reduce file size of already uploaded media in wordpress:
- Click on the image and click edit
- Click “edit image” underneath the image (left side)

You will see the dimensions on the right-hand side.
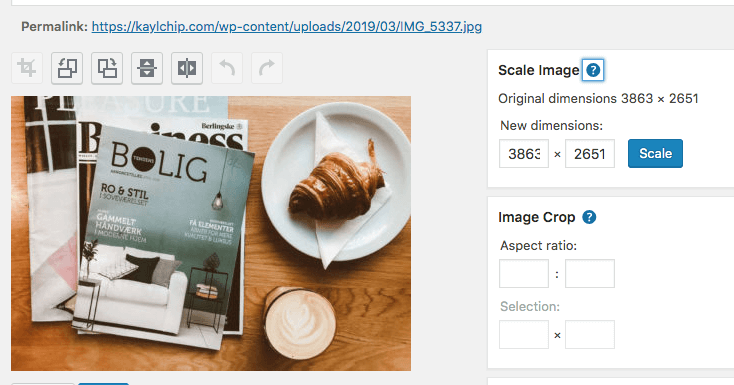
Change the dimensions so that the width is the same as your blog width (mine is 950). The height will populate on its own. Click scale and save.
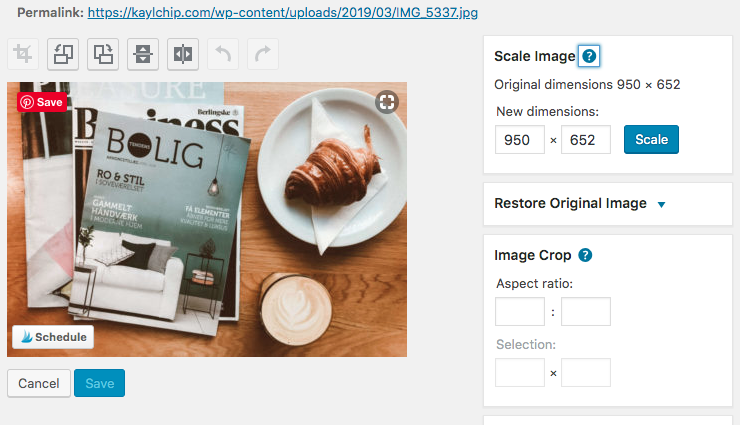
All done! Your photos that live in WordPress have been optimized.
If you have an overwhelming number of photos, I recommend running a Google page speed test to identify the photos that are really weighing down your site and start there.
Now, how to avoid having large files to begin with? It’s all about how you save your images in Lightroom and Photoshop.
Saving photos in Lightroom for your blog:
When you go to save in Lightroom, bump the quality down from 100 (found under “File settings”). I prefer to keep mine around 80, but play with yours to make sure you aren’t sacrificing quality.
Under image sizing, click resize to fit, short edge, and enter the width of your blog in pixels. I use short edge for my blog, but test yours out as you might need to click long edge for your particular blog.
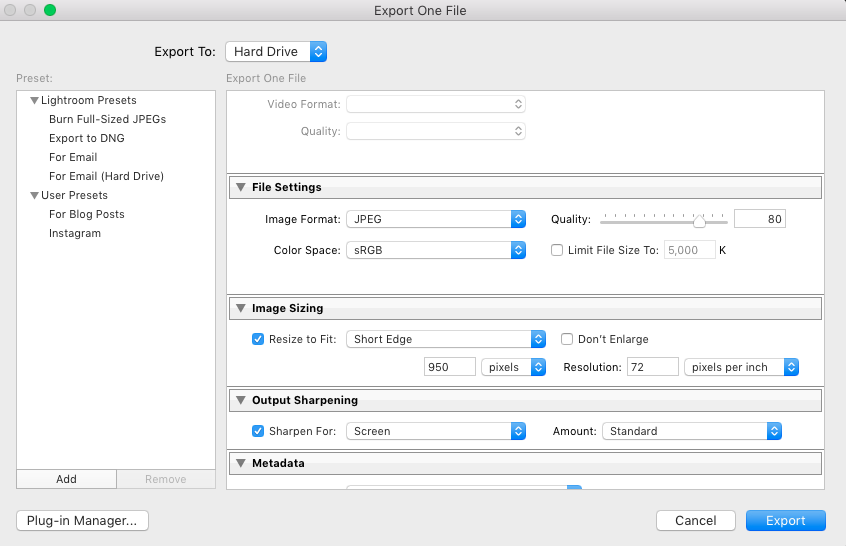
I’ve been playing around with “Sharpen for screen”, but I usually leave this unticked. Feel free to experiment with this and see if you notice any difference.
Saving photos in Photoshop for your blog:
When you save in Photoshop, click File, Export, Save for Web.
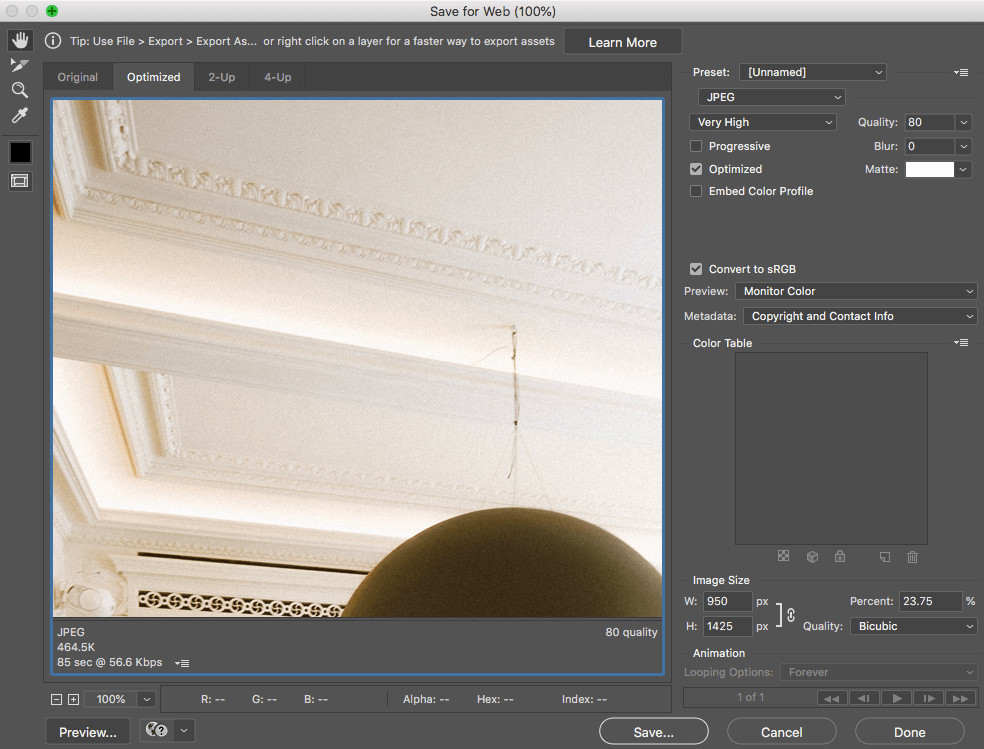
Play with the quality (top right, I usually do around 73-80), then go down to image size and change the width to your desired blog width (again, mine is 950). You can see how large the file size is in the bottom left side of the blue square outlining the preview of the photo under JPEG. The photo above is now at 464.5KB in size, under the 500KB maximum.
Once I’ve saved my photos, I always run them through Tinypng to decrease the file size. Finally, I upload them to WordPress, and the smush plugin decreases the file size even more.
I hope this saves you time by avoiding large image sizes within your blog posts. Going through 65 pages of images in my library today and optimizing them was not fun!
Xx,
Kaylee

The comments +